Introduction
Have you ever tried to build a social media content calendar, maybe even for multiple clients, in Notion? You probably know the feeling of getting lost in a tangle of databases, confusing properties, and endless views, trying to make it all work. Building a scalable, multi-client system from scratch can be a time-consuming undertaking and take away time you could spend writing posts.
But it doesn't have to be that hard. In this post, we will provide a step-by-step guide on how to build a powerful and organized Notion system that can handle all your clients and content. Even better, I'll give you a link to download a complete template so you can skip the hard work and get started instantly. Whether you want to learn the underlying system or just get a finished product that works right away, this guide is for you.
Designing a Scalable Notion Setup
Before we dive into building, it's crucial to understand what we are looking to solve so we can design a maintainable and scalable setup. A common pitfall for many Notion users is trying to do everything in a single, massive database. It seems simple at first, but it quickly becomes a tangled mess, especially when you're managing content for multiple clients. Data gets mixed up, analytics are hard to track, and sharing a client's specific content calendar becomes a headache.
For us, we want to plan and organize posts, potentially collaboratively internally or externally (this means write access to pages). And we want to share some information externally with our clients (only read access to pages).
The best way to solve this is to think of it like a manufacturing process: you need to separate and organize your inputs and outputs. That is why the system we are going to build does this by using one main database per client, the Content Database. This database is embedded in a top-level page Content Calendar for each client. Figure 1 shows how this looks like.
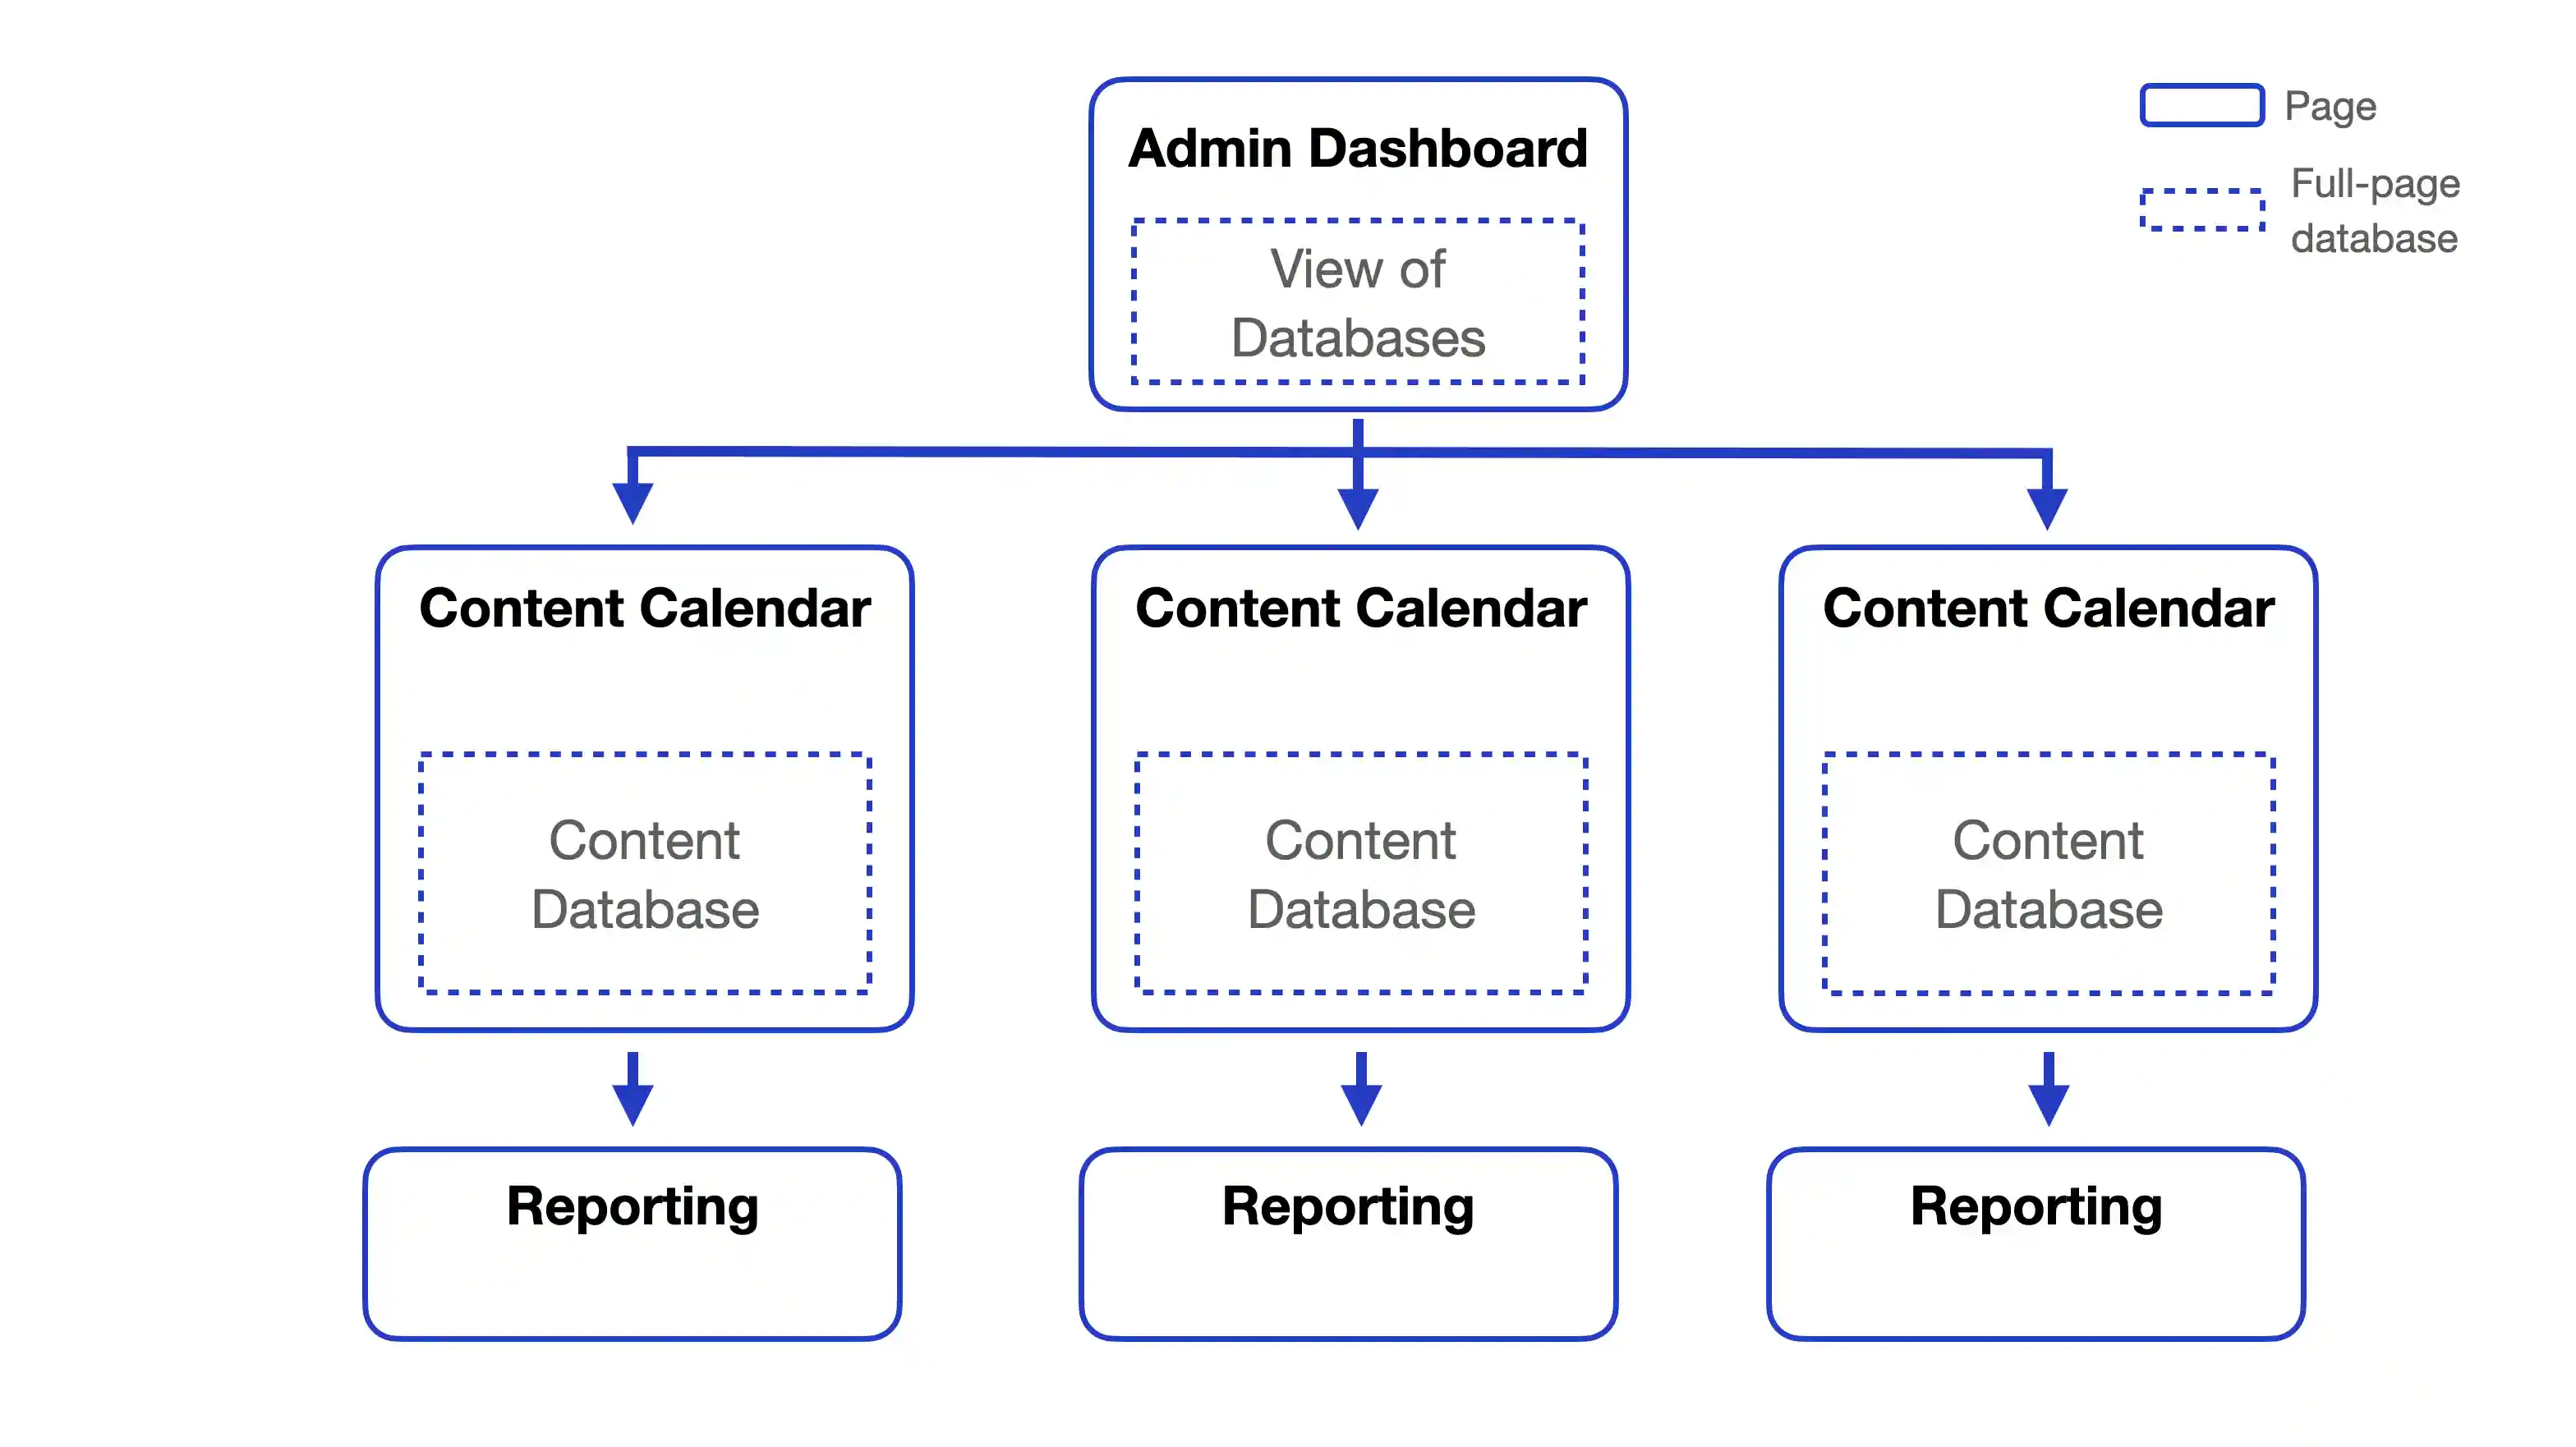
Figure 1: Page and database hierarchy. The Admin Page at the top contains one page per client/account. Each of those contain an inline database to hold the posts and a page for reporting.
Here's why this approach is the most effective:
- Clean Data Separation: Each client's data, their posts, platforms, and statuses, lives in its own dedicated space, a branch starting with the Content Calendar. This prevents cross-contamination and ensures that when you're looking at Client A's content in the left most branch, you aren't accidentally seeing data from Client B in say the middle branch in figure 1.
Built-in Analytics & Reporting Pages: With each client in their own space, you can create a dedicated analytics and reporting page that links only to that client's data. This makes it incredibly easy to track performance and share a clean, focused report with your clients. Of course you could also add the report in the Content Calendar page, but I like to follow the single responsibility principle to keep things organized. The Content Calendar page is where we create the posts, and the Reporting page is where we report on it.
-
Scalability for Growth: This is the most critical feature of the system. As you add new clients, all you have to do is duplicate an existing Content Calendar page (using the option without content in Notion) and rename it. This saves you from having to manually rebuild complex relationships and filters every single time, allowing your Notion setup to grow seamlessly with your business.
-
Targeted Publishing: The one-page/database-per-client model is crucial for the BroadPost integration which can automatically publish scheduled posts for you. It allows the app to connect directly to a single source of truth for each client, ensuring that the right content is published to the right platforms.
To tie it all together, we'll also use a top-level Admin Dashboard that links to each client database. This gives you a high-level overview of all your clients in one place, while still maintaining the clean data separation in the background.
Now that we have designed our setup, let's build it.
A Step-by-Step Guide to Building the System
Now that we defined what we are going to build let's get into how to build it. We'll build the setup piece by piece, starting with your main Admin Dashboard at the top of figure 1 and then moving to the client databases and reporting.
Step 1: Create Your Top-Level Admin Dashboard
First, create a new, empty Notion page and give it a descriptive title like Content Calendar Admin Dashboard. This will be our home base, the central hub where you can see all your clients' work at a glance and navigate to their specific calendars.
Step 2: Build the Client Database (The Foundation)
Inside our new Admin Dashboard page, create your first client page/database. This is the foundation of the entire system.
Create a New Page: Click /page and give it a clear name like Client A. This is your container for everything related to this client.
Create an inline database: Inside of this new page, type /database and select Inline database. Give it a clear name like Content Calendar - Client A.
Define the Post Workflow: Before we add any columns, we need to think about the journey a social media post takes in our setup. A typical workflow has a few key stages. I use the following:
- Draft: The post idea has been created and is being worked on.
- Scheduled: The post is ready, and a publication date has been set.
- Published: The post has gone live on at least one platform.
- Archived: The post is no longer active, but its data is being kept for reporting and reference.
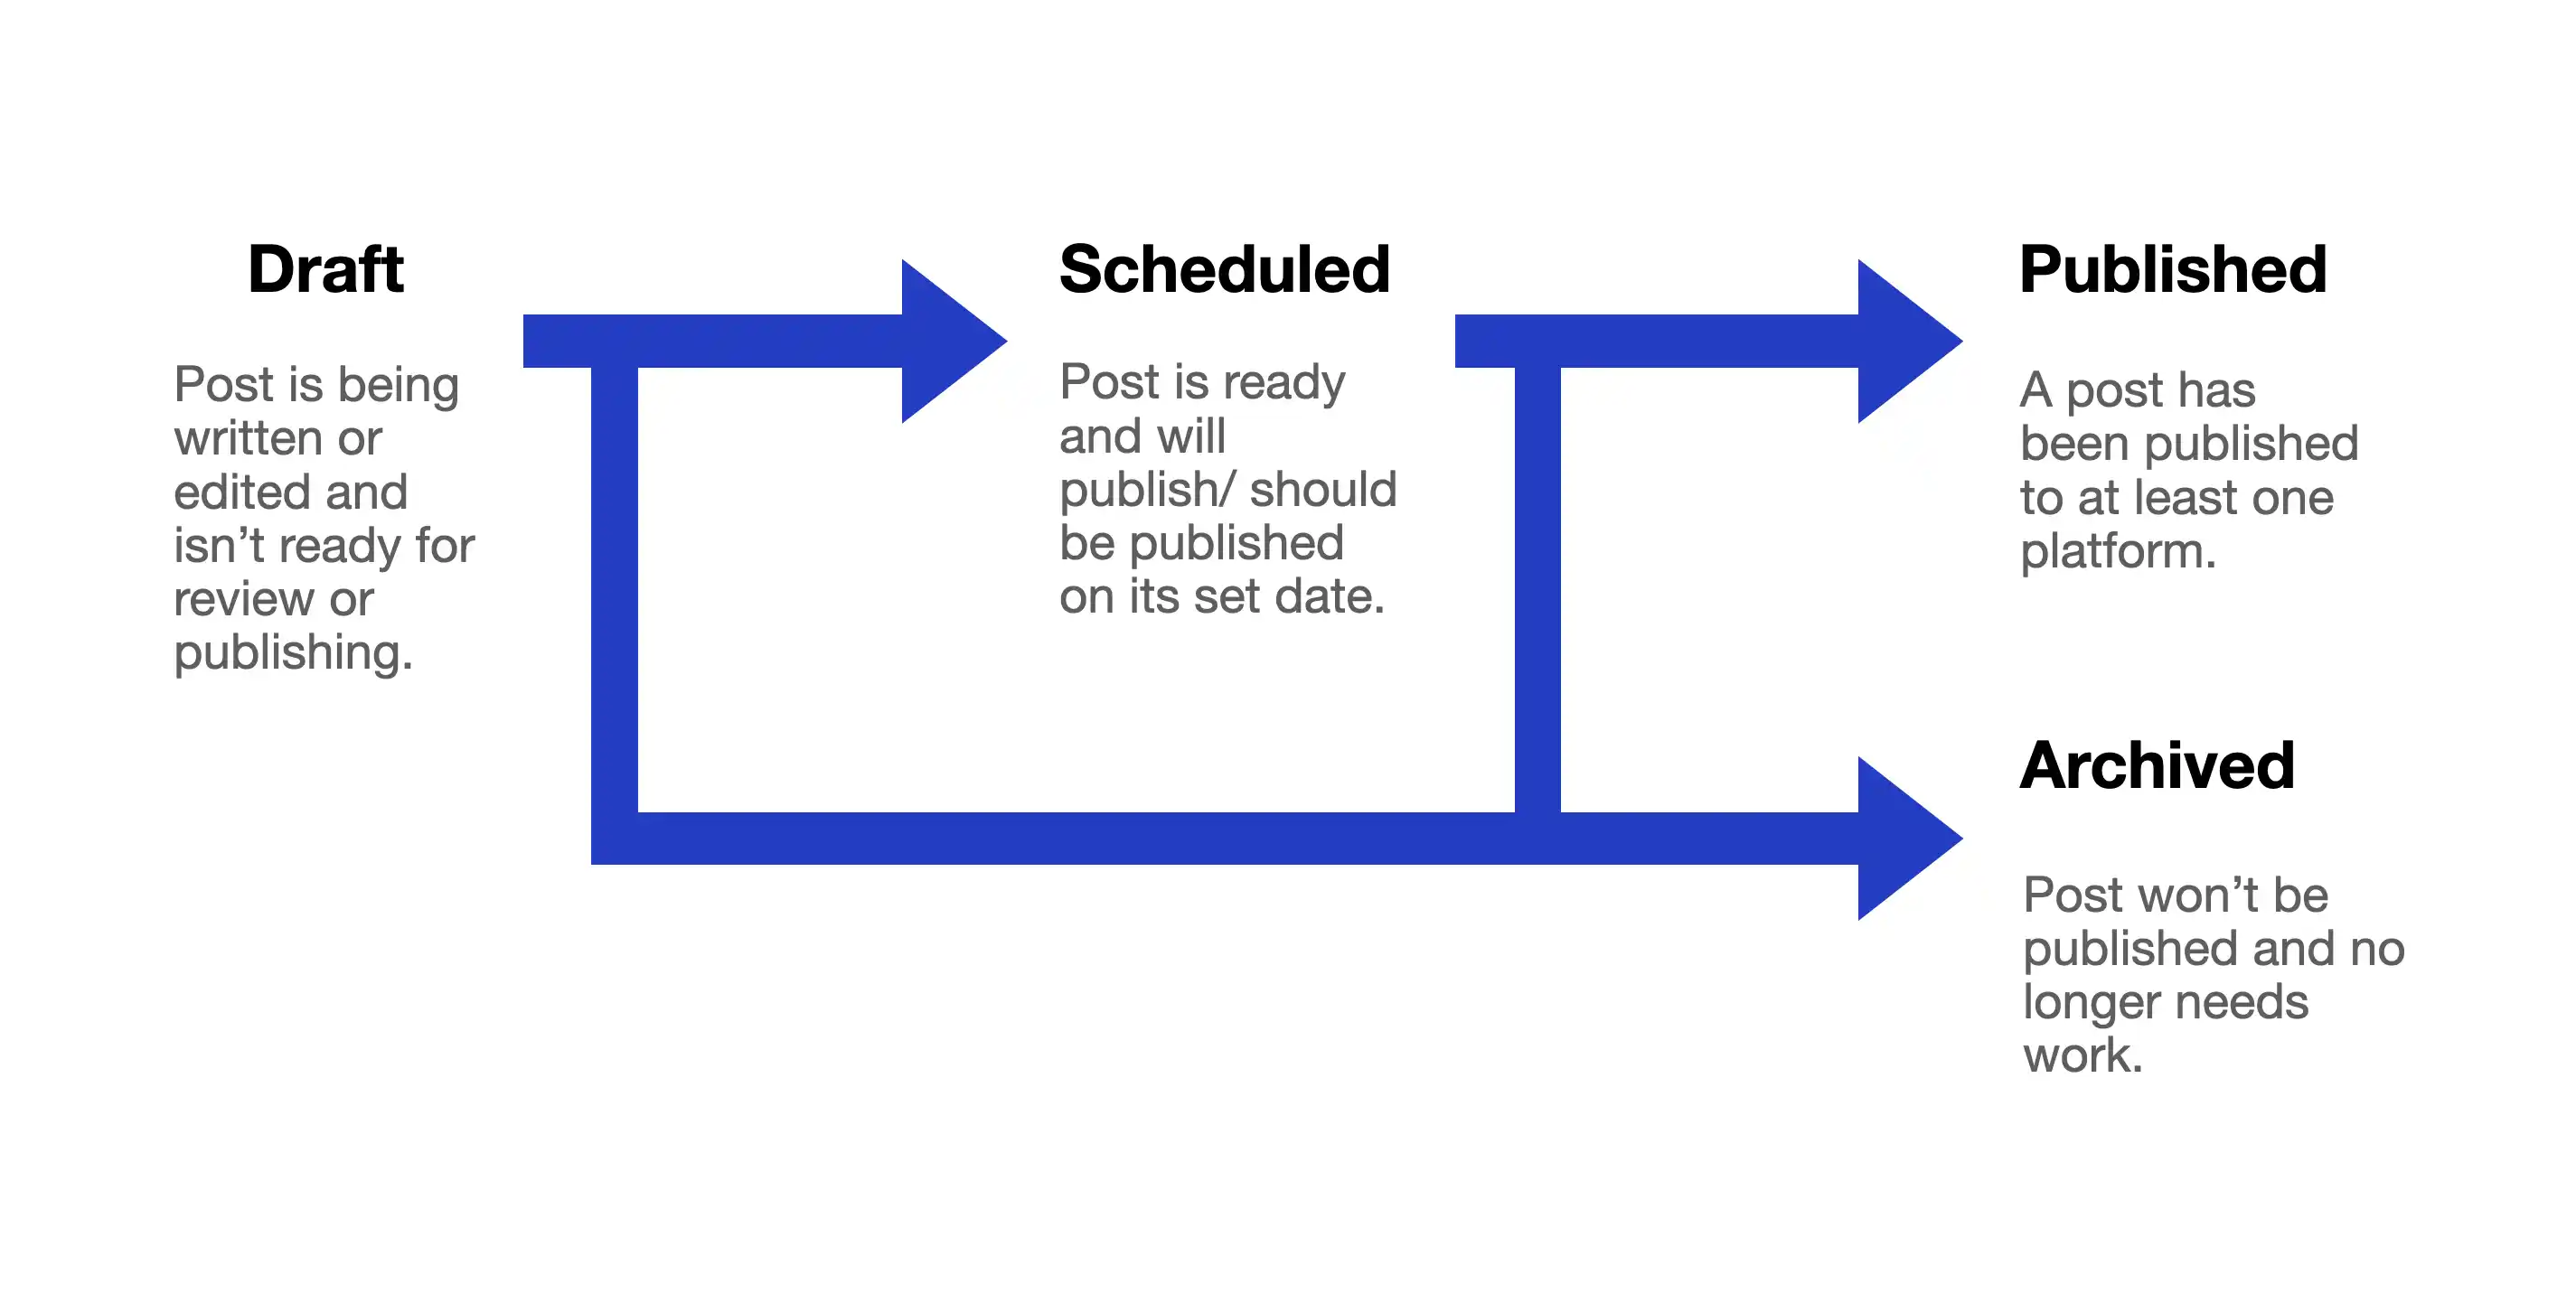
Figure 2: Post lifecycle. A post begins as Draft and can end up as Published or Archived.
Add Your Columns: Now, let's add the necessary properties to your new database. These columns are essential for organizing your content, automating posts with BroadPost, and tracking performance:
- Status (
Select): Create aSelectproperty and add the four values we just defined:Draft,Scheduled,Published, andArchived. This will be the key to managing your workflow and for BroadPost to know when to publish a post. - Publish Date (
Date): Add aDateproperty. This is a critical field that specifies when the post should go live. - Platforms (
Multi-select): Create aMulti-selectproperty to indicate which social media platforms the post should be published to (e.g.,Instagram,Twitter,Facebook,LinkedIn). - Analytics Fields (
Number): To track performance, add threeNumberproperties:Impressions,Reactions, andShares. This allows you to log key metrics directly alongside the content.
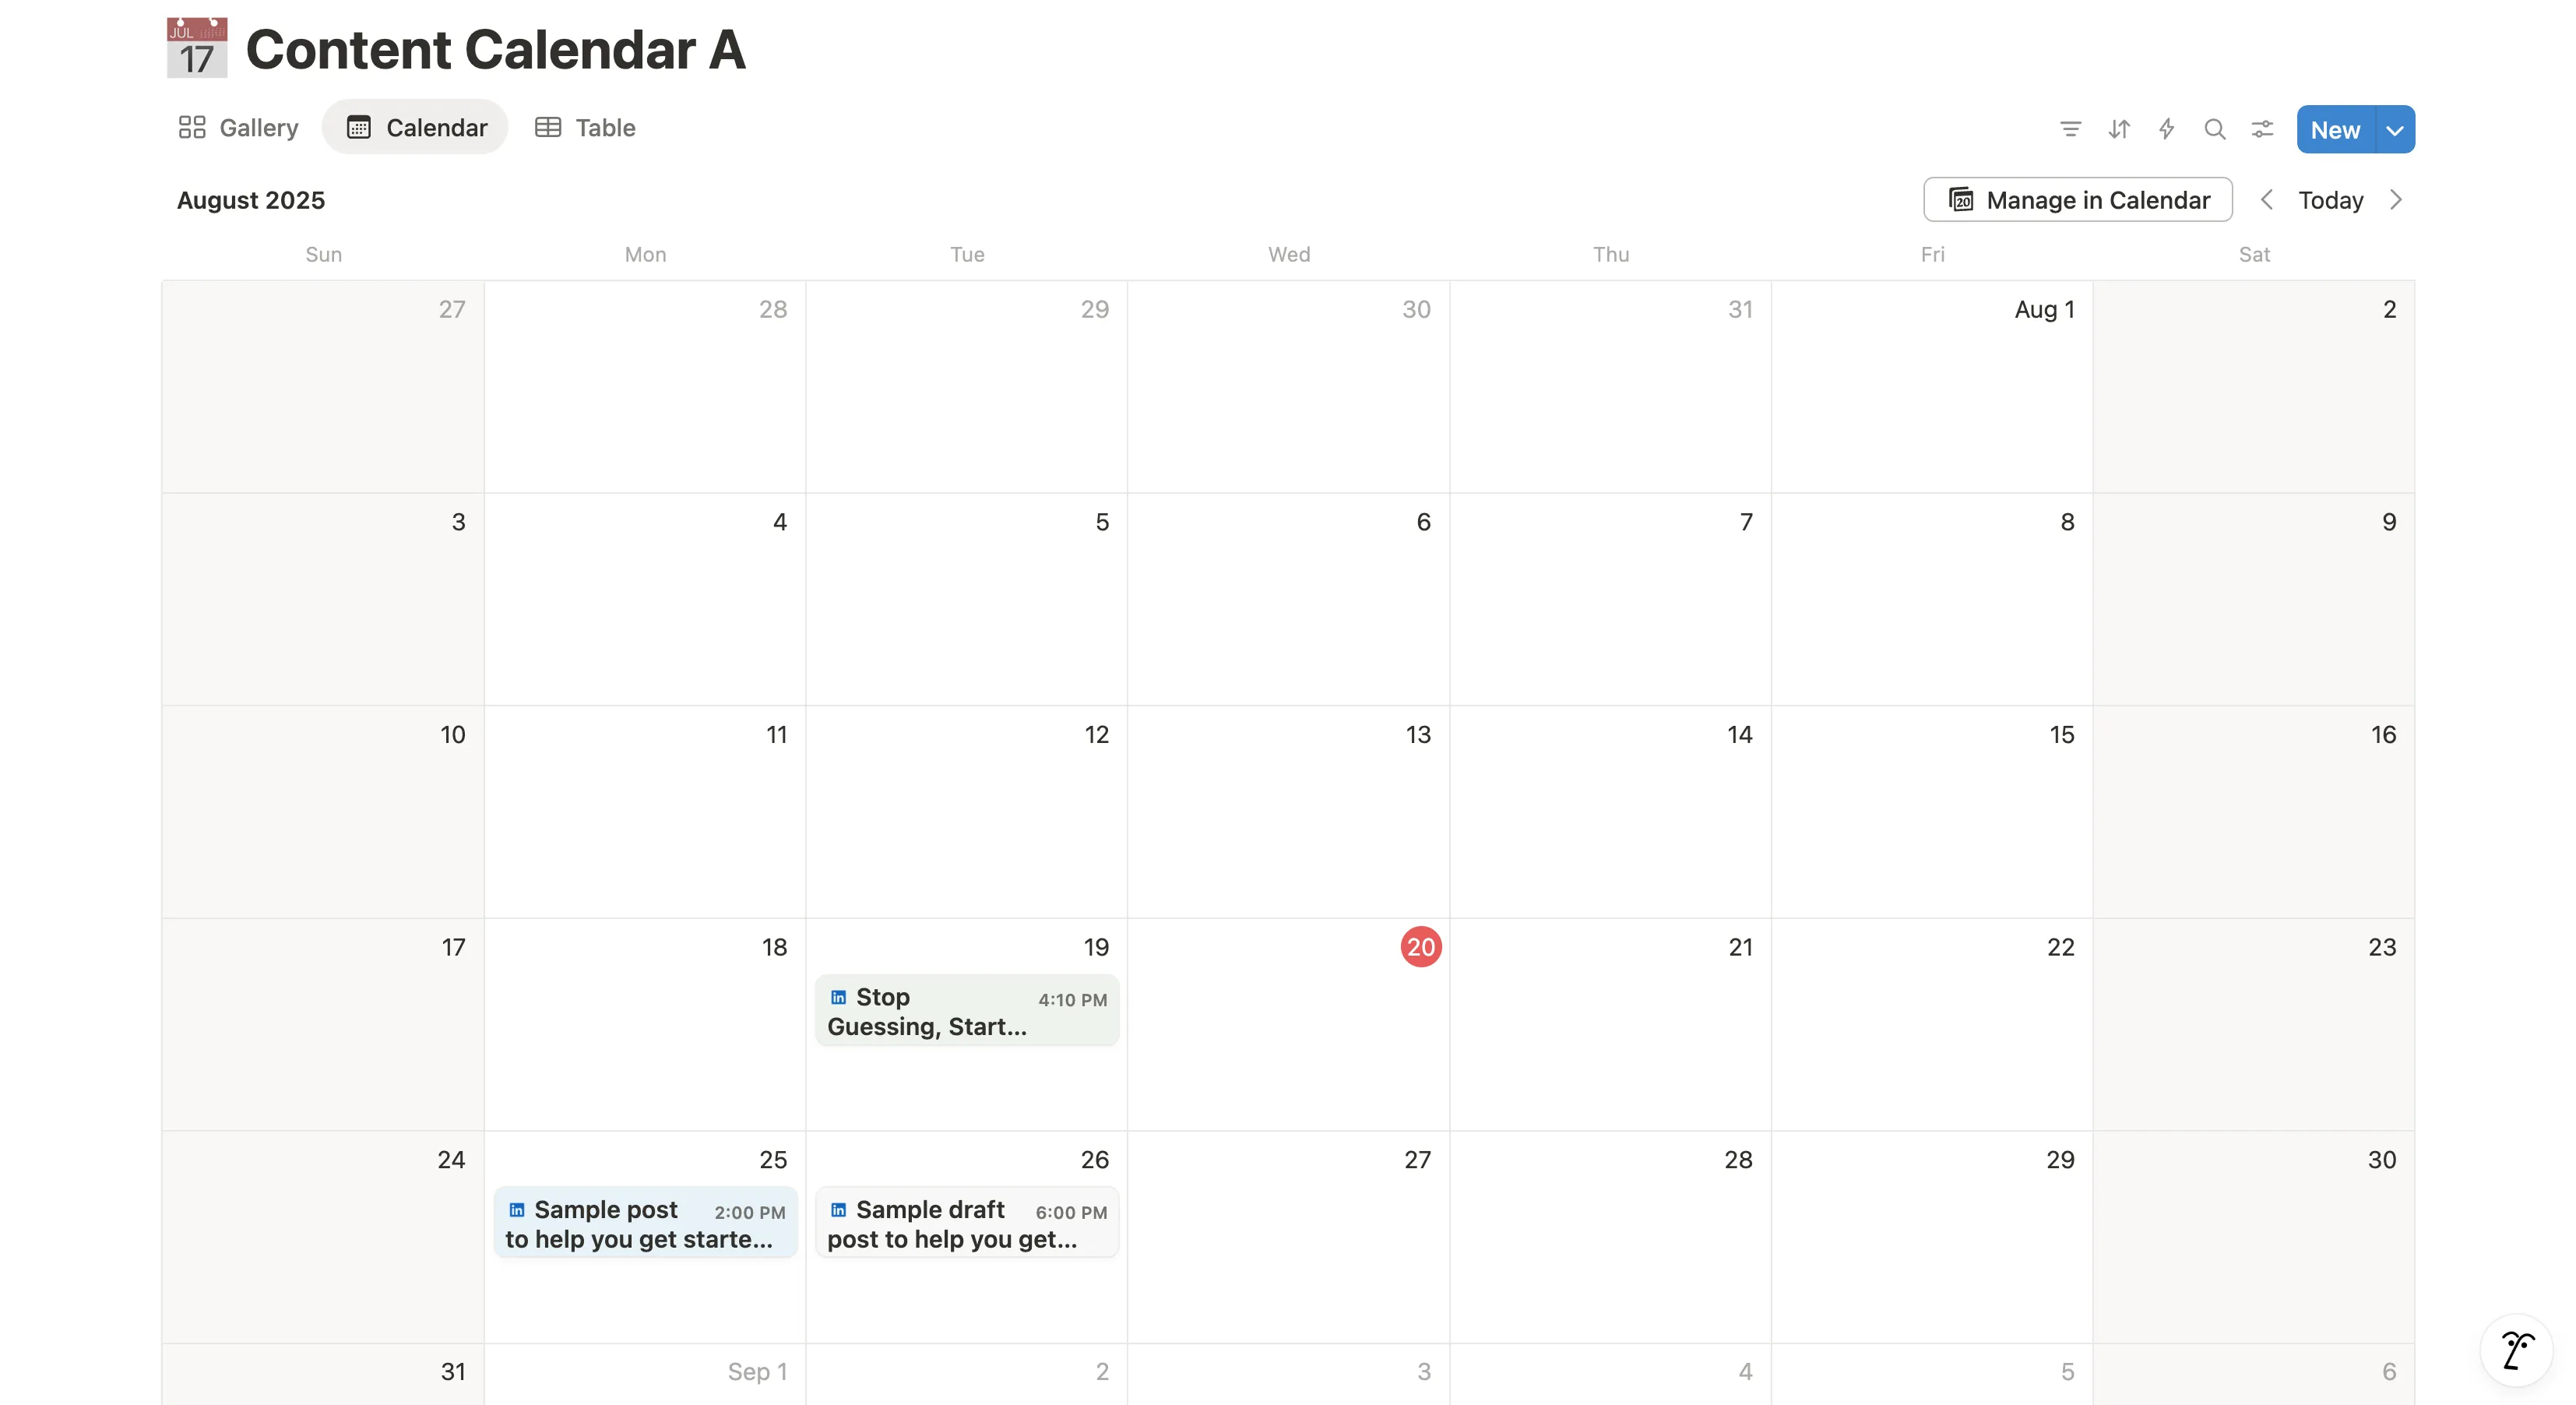
You can see the result in figure 3. The page contains the embedded database Content Calendar A with multiple views (showing the table view).
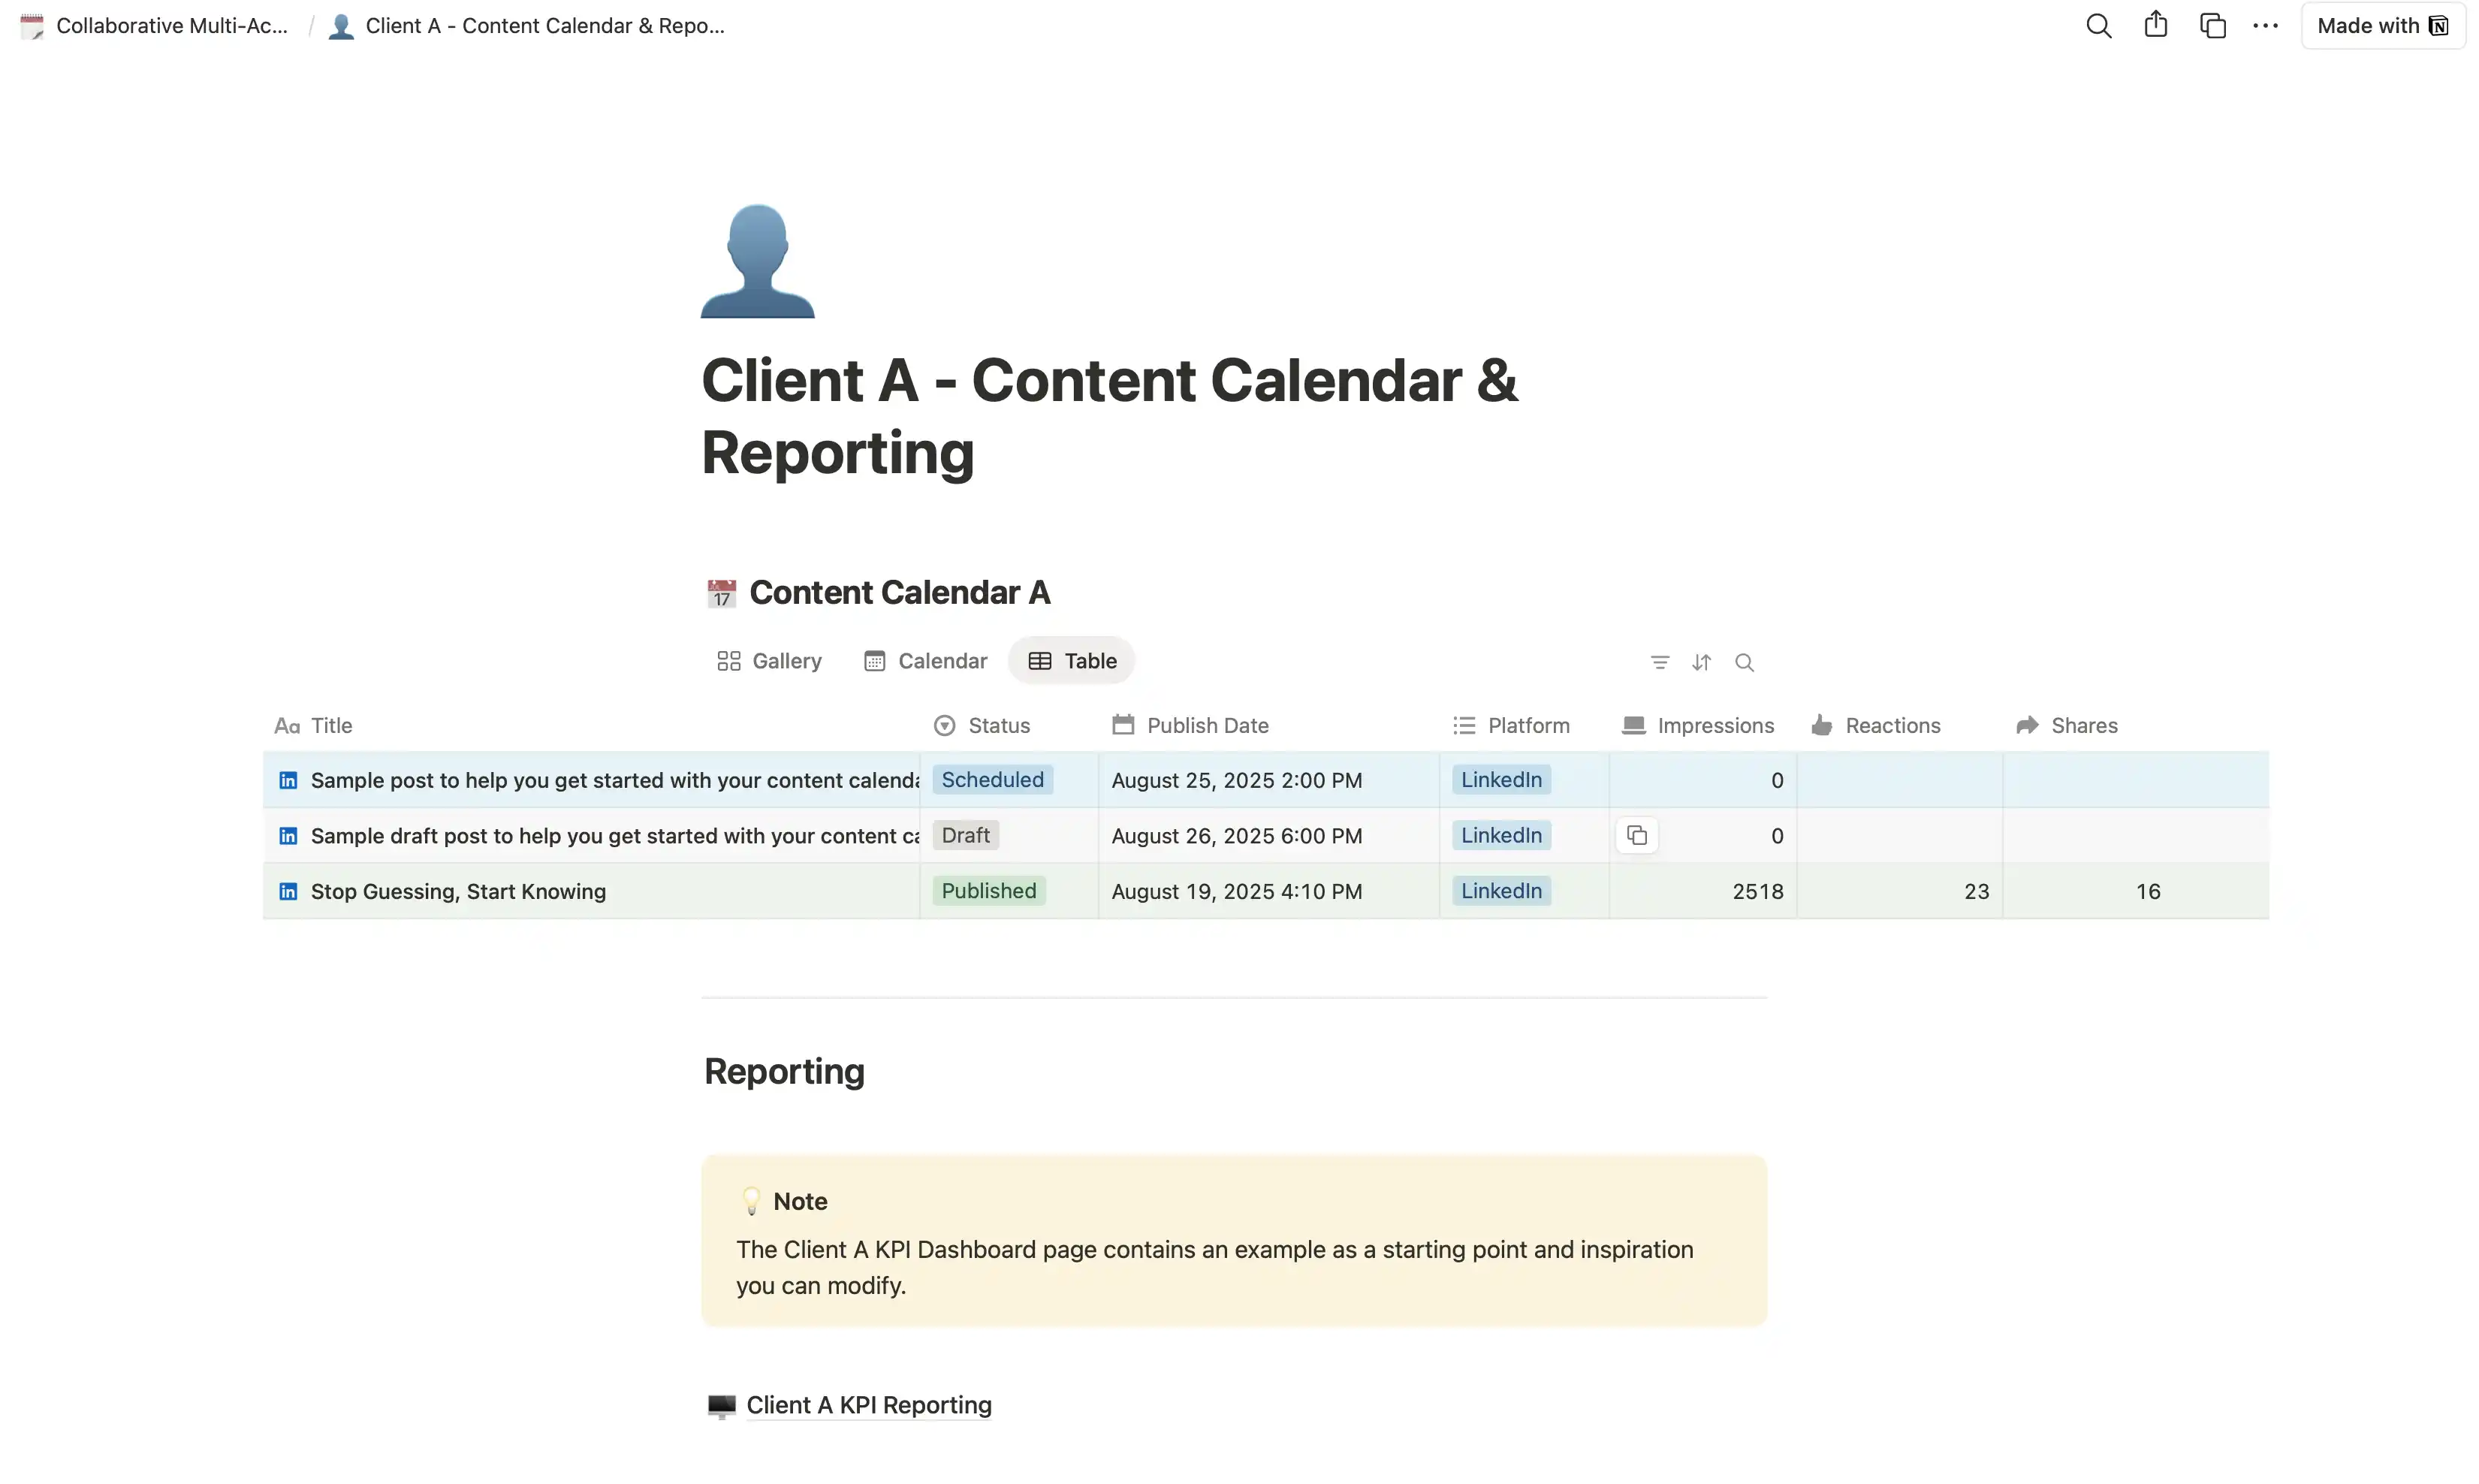
Figure 3: Final Client A page. This page contains an inline database with multiple views and specific columns for the content and also a reporting page at the bottom.
The database supports multiple views, like the grid/gallery view in figure 4.
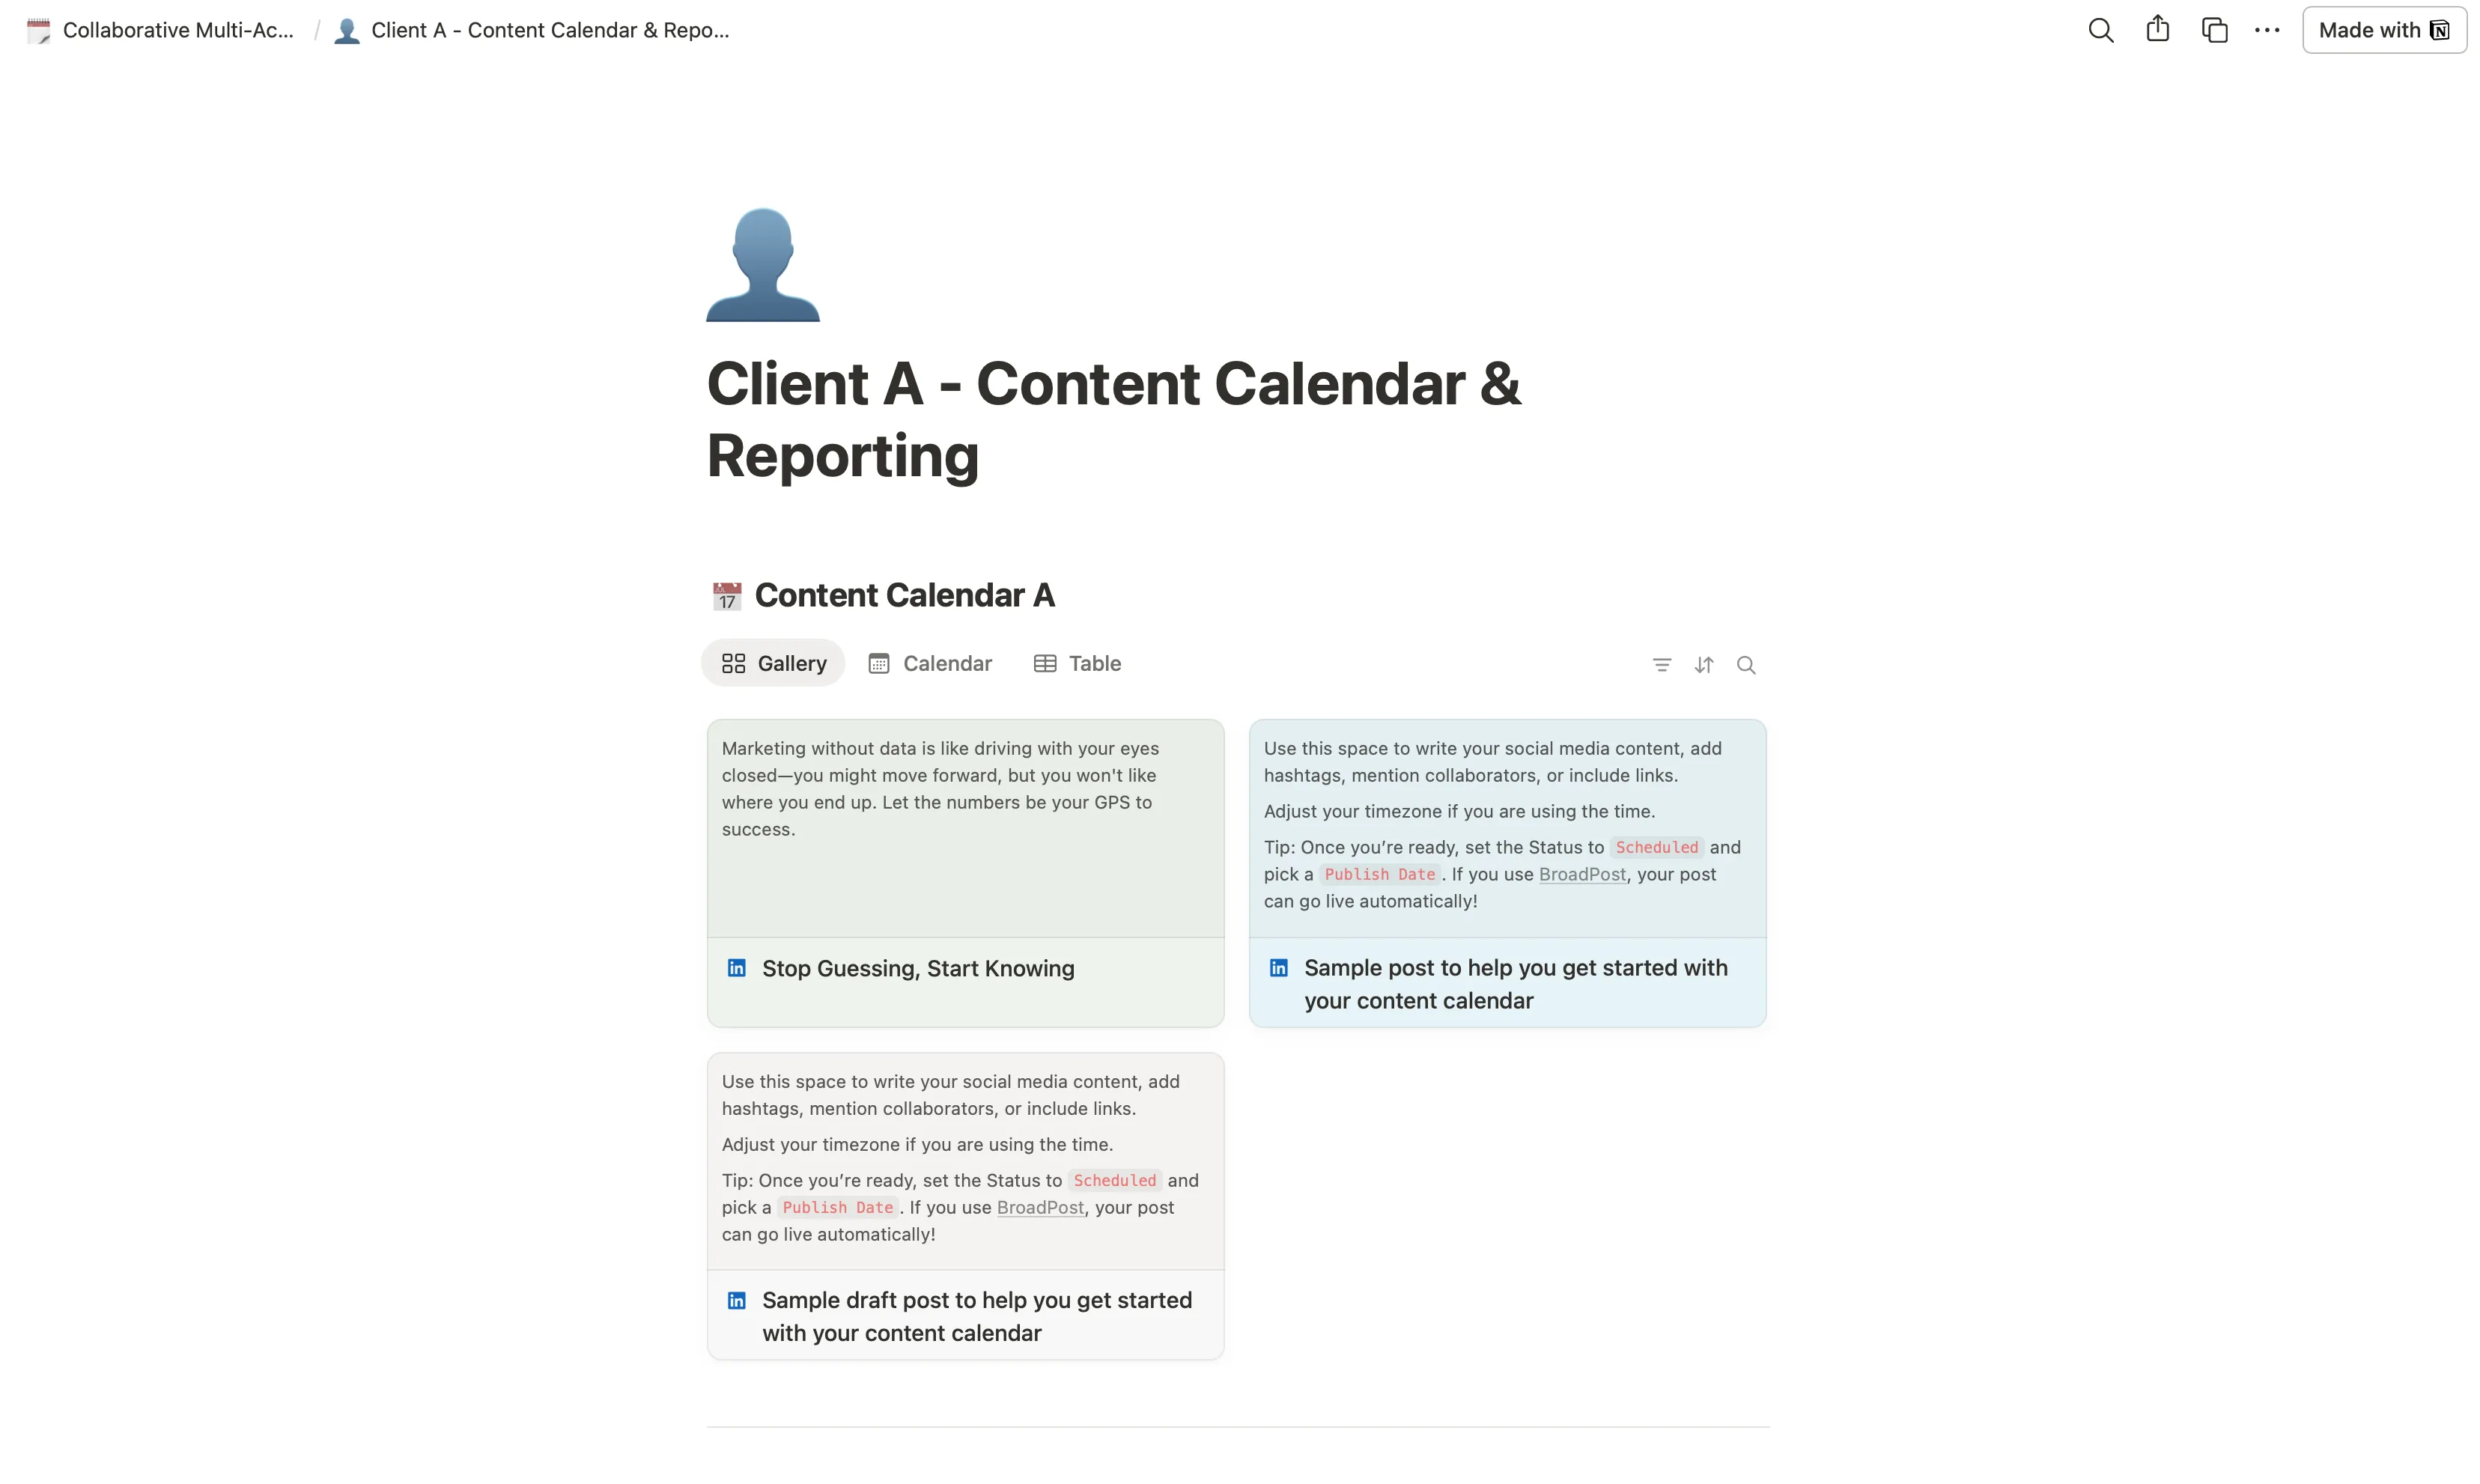
Figure 4: Grid/gallery view of the same database. You can easily switch between views on the page, depending on what you want to see.
As you can see, I've added some sample posts to the database to better illustrate how the database looks like. At the bottom of figure 3 you can see the section Reporting. Let's work on this next.
Step 3: Set Up a Client Analytics/Reporting Page
The next step is to create a dedicated page for client reporting potentially to be shared with the client.
- Create a New Page: In our container page
Client Awe create a new page calledClient A KPI Reporting(named Reporting in figure 1). - Create Linked Views: Inside this page, you'll create different views of your
Content Calendar - Client Adatabase. This is where you can showcase specific information for client reports. For example, you can create a gallery view ofPublishedposts and a board view to show the status of all posts. You can create a dashboard that only shows key metrics of the most recent posts. The possibilities are endless. Once you have this set up you can share the page with your clients and also have an overview for yourself. Figure 5 shows an example.
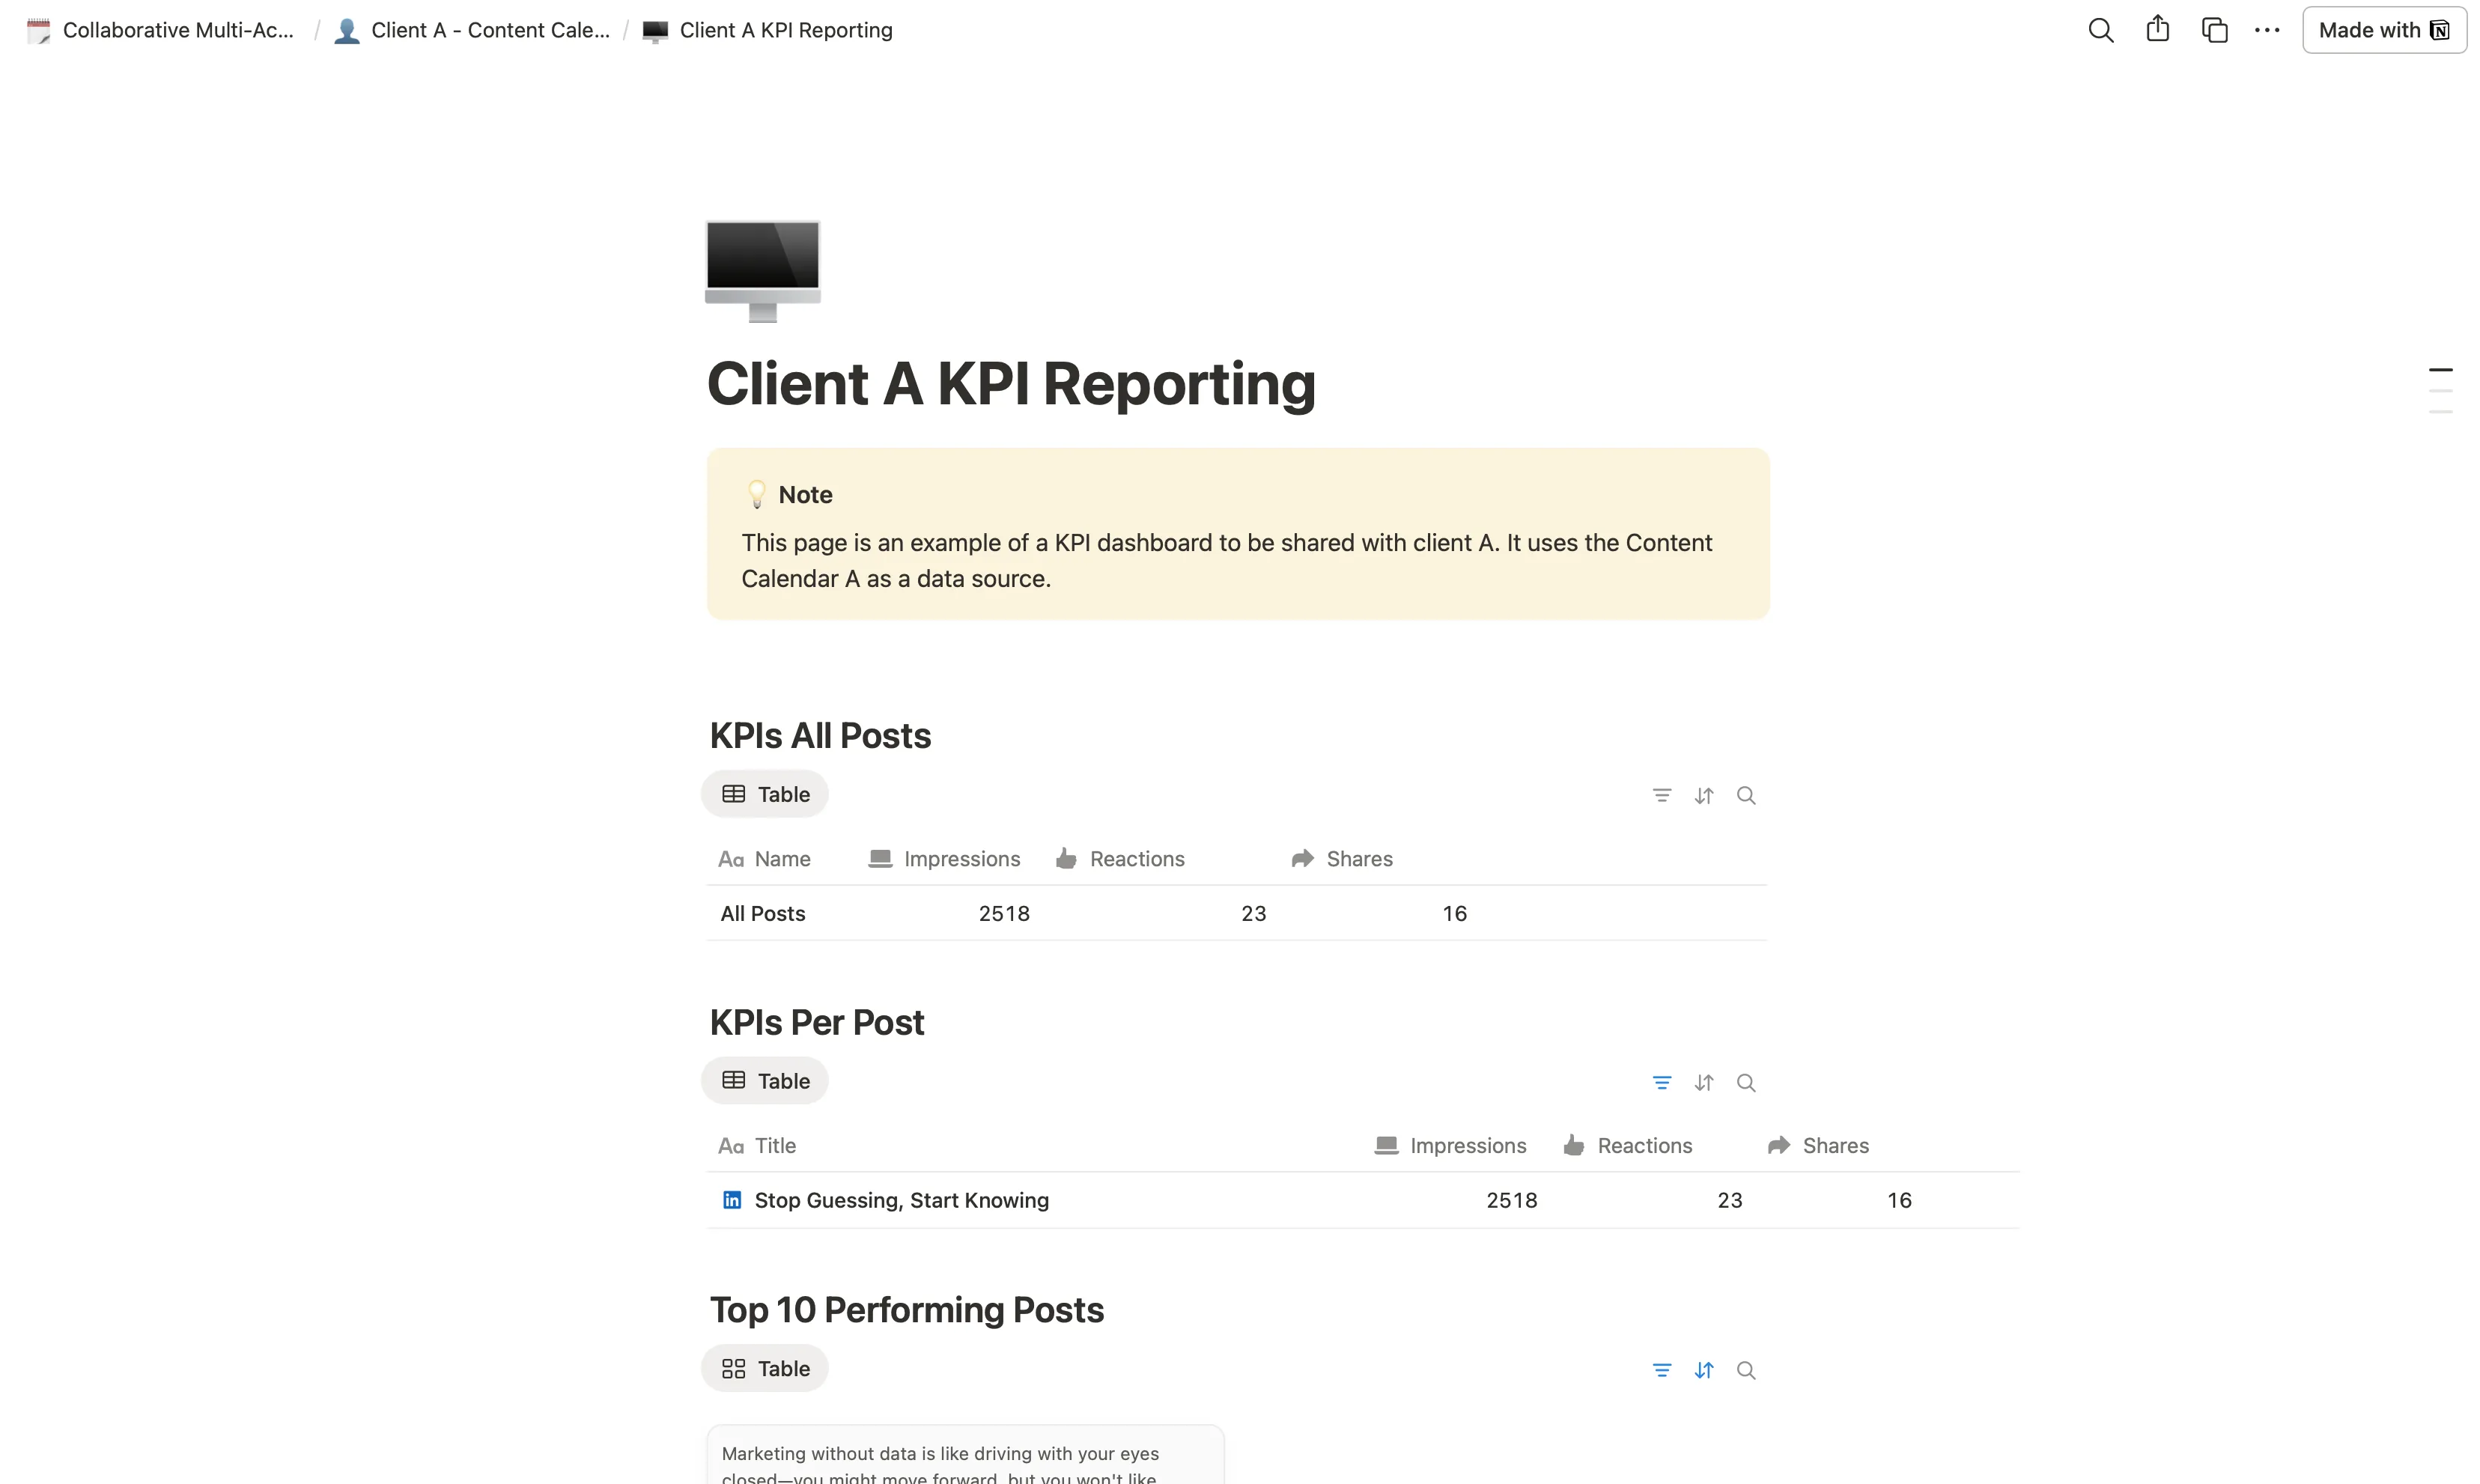
Figure 5: Reporting page. This page contains views of the content database from figure 3 to provide analytics and reporting.
This structure ensures that you have a master view for yourself while also providing a clean, shareable report for each client.
The Shortcut: Download the Free Template
You've now seen how to build the foundation for a scalable Notion content calendar. As you can tell, it's a lot of work just to get the system ready.
That's why I've made the complete, pre-built version of this system available as a free Notion template. It has everything we just discussed. The dashboards, the databases, and the reporting pages are all ready for you to use. Just click here to get it.
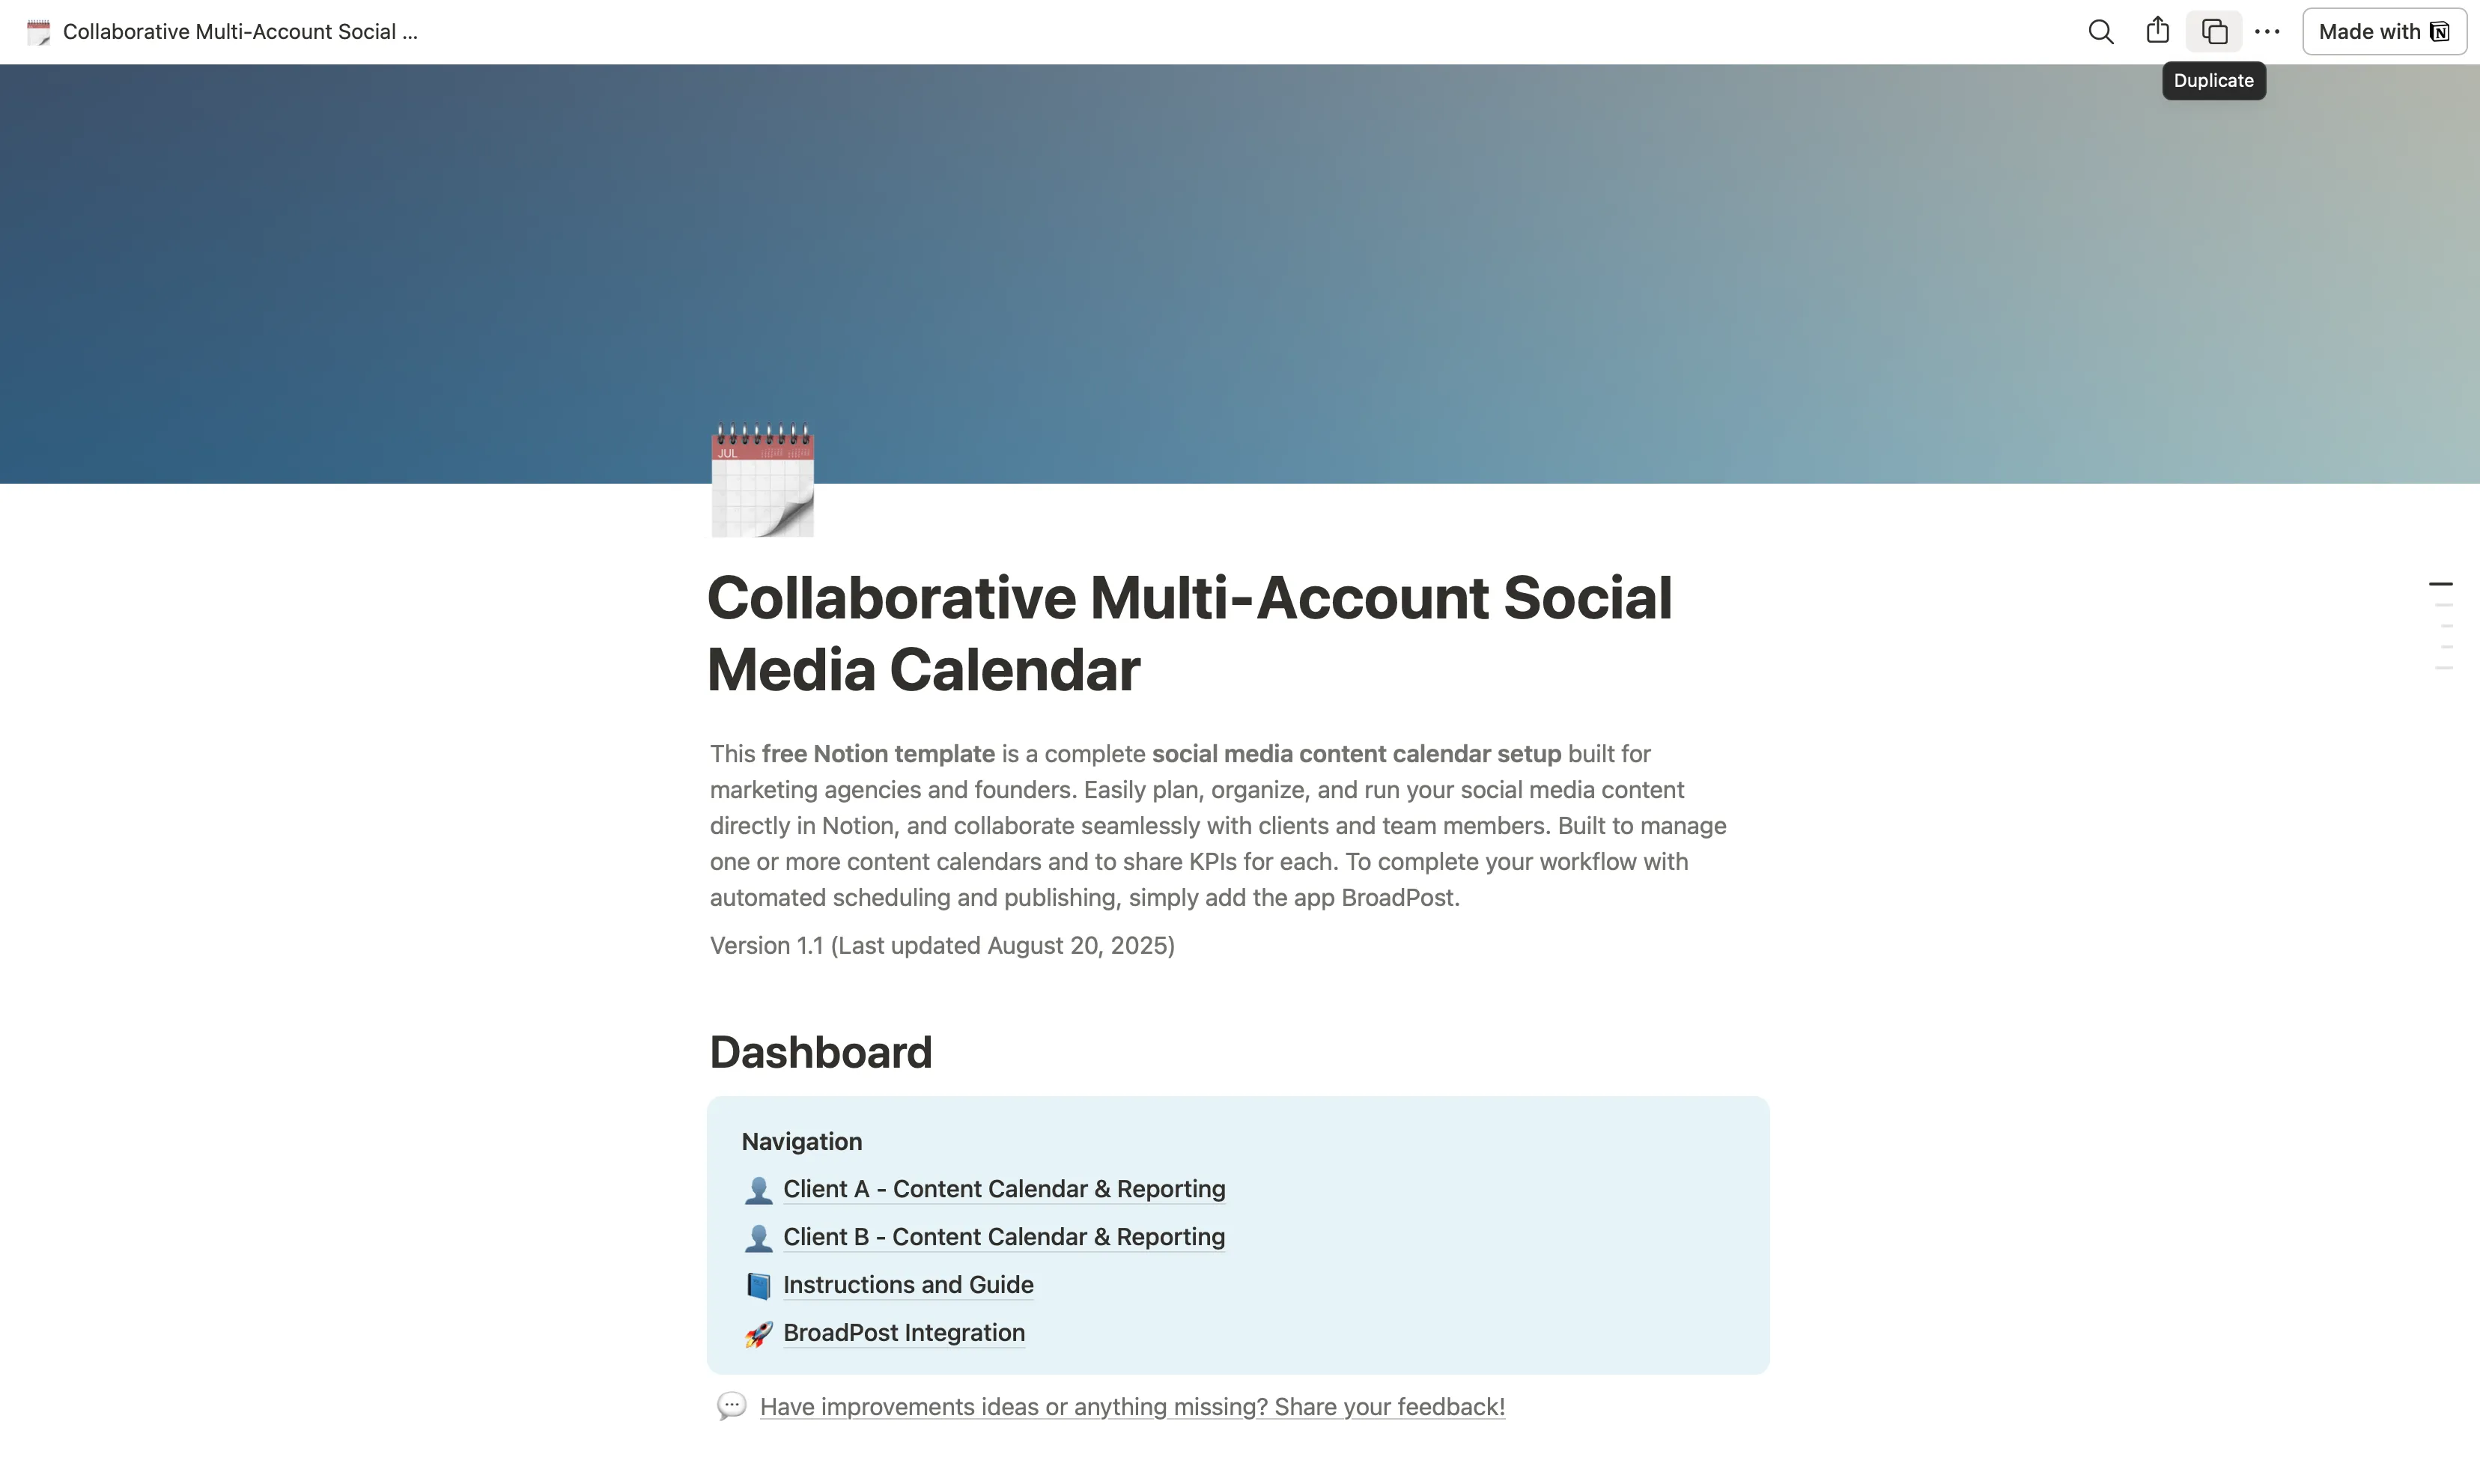
Figure 6: The Notion template. To start using it, follow the link and click duplicate on the top right of the page.
How to Use the Template: Your Getting Started Guide
Once you've downloaded the template, getting started is easy.
- Duplicate the Template: Open the link and click
Duplicatein the top right corner, see figure 6. The entire workspace will be copied directly to your Notion account. - Add Your First Client: Inside the
Content Calendar Admin Dashboard, you'll see two sample client pages (Client A - Content Calendar & Reporting, same for client B). Simply duplicate one of these page, rename it for your first client, and you can start your work. - Share Analytics: The template includes a sample shared page. You can share this page with your clients to give them a live view of their content progress and key metrics.
Supercharge Your Workflow: How BroadPost Automates Your Notion System
This system is powerful, but what if you could eliminate the final, most tedious step: manually publishing posts? That's exactly what BroadPost does.
BroadPost is our app that turns your Notion database into a social media automation tool. It connects directly to the system you just built and monitors the Status and Publish Date columns. When a post's status is set to Scheduled and its publish date arrives, BroadPost will automatically publish it to the platforms you selected. It's the final piece of the puzzle that turns your organized content calendar into a hands-free publishing machine.
We're also working on a new feature that will automatically report the analytics back into your Notion database after a post is published, so you'll never have to manually track performance again.
You can sign up for the special offer for Notion users, a one month free trial of BroadPost, to automate your new Notion workflow.
Conclusion
We've built a Notion setup to plan content for one or many accounts that keeps every client's content organized, makes reporting simple, and scales effortlessly as we grow. By separating each client into their own database, linking them through an Admin Dashboard, and preparing dedicated reporting pages, we have a clear structure that actually works.
With the free template, you can skip the setup time and start using this setup right away. And with BroadPost, you can even automate publishing to save even more time.
This isn't just about staying organized. It's about building a modular setup that grows with us.